I recently decided to replace my central heating programmer with a programmable thermostat, and decided to go for the geeky option: a wi-fi connected model! So I ordered a PRT-TS Wi-Fi from Heatmiser, which can be controlled both via a Web browser and an iPhone app.
Overall, I’m happy with the product but I found it a little tricky to set up. The instructions don’t go into a huge amount of detail, a problem which is compounded by the fact that the Heatmiser support site was devoid of any information on this particular model at the time of writing, so I have discussed my difficulties below and explained how I resolved them.
Installation
I won’t go into too much detail on the physical installation, but suffice to say, most people should get the unit fitted by a qualified electrician. There’s only a page and a half of the small (A7 size) manual devoted to it, plus three wiring diagrams, and any mistakes could damage the thermostat and/or the boiler. The thermostat is designed to be flush mounted into a standard 35mm deep single back box. It can be surface mounted but it won’t look as good, particular as the thermostat is a few centimetres larger than the back box at each edge. I chose the latter option to save money, but will have it flush mounted at a later date. I will be interested to see what effect flush-mounting has on the Wi-Fi signal strength, if any.
Appearance & usability
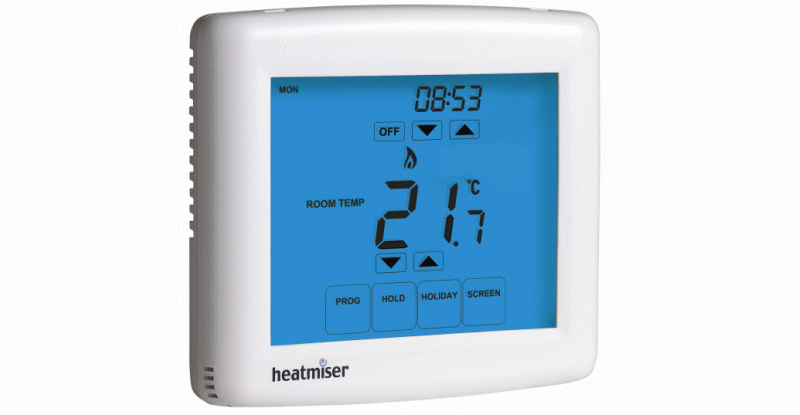
The thermostat is essentially a PRT-TS with an added Wi-Fi card, and it looks exactly the same from the outside. It’s reasonably modern-looking (as far as thermostats go!) with a touchscreen illuminated by a blue backlight. It displays the room temperature in the middle of the screen, which can be adjusting using the up/down icons below it. A slight niggle is that it can be difficult to see what you are doing – the backlight doesn’t come on until you touch an icon, by which time it is too late. I would personally prefer the backlight to come on when touching any part of the screen (not just an icon) and the unit to only respond to icon presses when the backlight is on.
A nice feature is the “Screen” icon which locks the screen for 15 seconds, allowing time to clean it without accidentally activating any functions.
You can also view and set heating programmes, set the clock, enable temperature hold and holiday modes from the touch screen. I found setting the time slightly strange, as the down button changes the hour down and the up button changes the minute up – changing the date works in a similar way with the month and day – but this is something that is rarely necessary to change and can be done from the Web interface or iPhone app anyway.
Wi-Fi setup
Setting up the Wi-Fi connectivity nominally requires a Windows PC and the configuration utility supplied on CD. However, when plugged in via USB, the device presents itself as a USB mass storage device (albeit a very small one: 6.5KB) containing a single file – CONFIG.TXT – which contains the network configuration information in plain text, which could easily be edited by hand by users of other platforms such as Mac or Linux. The file is fairly self-explanatory – the only thing worth pointing out is that the KEYMODE parameter (wireless encryption type) must be either WPA, WEP or OPEN. There’s a slight security issue in that if someone were to steal your thermostat, they’d have access to your wireless key, thermostat password and PIN, but this is a fairly unlikely scenario!
I had trouble getting the unit to connect to my Wi-Fi network until I switched my router (Linksys WRT54GS with Tomato firmware) from WPA only to WPA+WPA2 encryption. I’m not sure whether this means that the PRT-TS needs WPA2 encryption to operate (despite the configuration utility only showing WPA), or whether there is an issue with my particular router, but if you’re having trouble, it’s worth enabling WPA2 on your router. Before I managed to get WPA+WPA2 working, I tried using WEP encryption as a test but the configuration utility wouldn’t let me save the changes. I didn’t play with the OPEN option, so I’m not sure whether this refers to unencrypted Wi-Fi (and therefore will ignore any username/password) or WEP Open System encryption.
The device requires a static IP address, and port 8068 must be forwarded via the router if remote connection via the iPhone app is required.
It’s worth noting that the front part of the thermostat detaches from the rear, so it can easily be removed once installed, and the front part will power up when attached via USB which means you can set up and test the Wi-Fi connectivity before installing the unit on the wall. This isn’t mentioned in the manual, and neither is the fact that a Wi-Fi icon (similar to the one used on the iPhone) appears on the display when connected successfully.
Browser interface
The browser interface is full-featured if a little basic-looking – it’s reminiscent of a router interface from ten years ago. The so-called “Live View” panel on the right shows the actual temperature (to one decimal place), set temperature and heat status, and a refresh button as it doesn’t seem to auto-refresh. The main interface allows you to view and adjust heating programmes, temporarily override the temperature, lock the keypad remotely, set the clock and change network settings. There doesn’t seem to be a way to change the port on which the Web interface is accessible, which would be a nice feature to have.
It doesn’t contain any form of logging functionality, so it’s not possible to view temperature changes over time. This would be nice to see in a future firmware update, but I’n not holding my breath.
iPhone app
The iPhone app, a free download from the App Store, is similarly utilitarian. It allows you to see the current temperature (rounded to the nearest degree, unlike the browser interface), set temperature (which can be adjusted) and heat status. You can also view and adjust heating programmes via the app.
One quirk of the app is that you have to select whether you want to connect locally (i.e. when you are on your home Wi-Fi network) or remotely (via the Internet). It would be nice if the app could determine whether you are home or away and select the corresponding connection method dynamically.
The interface is fairly bland but it does the job. It’s a shame that the graphics aren’t retina ready, so they look jaggy on the iPhone 4 (which has been out for more than a year, so you would have expected Heatmiser to have updated their app!). It would also be nice if a future version of the app came with iPad support – the current version works fine on the iPad but doesn’t take advantage of the bigger screen.
I was left scratching my head for a while, as I was originally able to connect via my Web browser but not via the iPhone app. This resolved itself once I moved my router closer to the thermostat, so it seems that the protocol used by the iPhone app is less forgiving of low signal strength (and potential packet loss) than standard HTTP over TCP/IP. Again this is something that should perhaps be mentioned in the manual.
Conclusion
It’s a version 1 product, so is sometimes a little rough around the edges, but the hardware is solid and the product could easily be improved with updates to the Web interface and iPhone app. The manual is fairly basic, which I can understand is necessary to minimise the size and weight of the box, but why not include a more detailed version on the included CD and/or on the Web?
One final point is that I was slightly perturbed to find that the thermostat, which I paid £150 plus delivery for via Heatmiser’s own shop, is available for as little as £126 delivered from some resellers, so it pays to shop around!
Update
Heatmiser tweeted me and pointed me towards their document download area which contains some useful information. They also say they’re working on a new version of the iPhone app, iPad and Android support, multi-zone and logging functionality, and suggest that users email support@heatmiser.co.uk with any further suggestions.
Also, the £126.20 price I found is actually ex-VAT (thanks Luke!) so it is actually best to buy from Heatmiser directly.


Ian,
Thanks for the response. I’ll be going for the same model as you. The thermostat is just a stat, with a separate timer/programmer at the boiler end. Can you give me some more info about how you changed the wiring? As I understand it, my current stat already has a permanent live, the issue is that it does not have a neutral (it has a switched live instead).
I’m considering the alternative option of leaving my current stat, turning the temp high (so it is always switched) and running the heatmiser from a separate fused spur ill set up from a nearby socket. Not as tidy, but easier to switch back in future if needed.
hi,
I’m so glad that i stumbled across this web site as there is lots of good advice. I am however still having issues with my PRT-HS TS WiFi model. I have it installed and it functions great with the hot water and central heating in the house, but for no end of trying I cannot get the WiFi bit to work.
I’ve set the config file up as the manual suggests but still cannot get the little wi-fi signal on the stat. I’d noticed some comments about poor wi-fi range but even with the stat literally sat on top of the router I get nothing. Have also been onto the helpful guys at Heatmiser, who say it all seems set-up correctly but I still don’t get the wi-fi but working.
I only bought the stat for the benefit of the remote control function, so am really keen to get this fixed. I’ve got my config file correct, I’m on v1.6 and still pulling what little I have out. Can anyone help me please, My router is a Thomson TG585v8.
Any help/guidance is greatly greatly appreciated.
Kevin
Hi Leighwill,
Thanks for the link. I received a schematic from Heatmiser’s ever helpfull support. A trip to Maplins for a mains (yes I had to explain it) relay and base – no documentation so I used a multimeter to establish what contact was what; and then to City Electrical factros for a suitable box to contain it was required.
I spent quite a while reviewing and checking the required (re)wiring to ensure I didn’t make an expensive mistake. It’s all working well now.
I’ve also received the refund check for the incorrect kit, ordered in error. All in all excellent service.
One quirk of the app is that you have to select whether you want to connect locally (i.e. when you are on your home Wi-Fi network) or remotely (via the Internet). It would be nice if the app could determine whether you are home or away and select the corresponding connection method dynamically.
It may be a function of my set up – bridged router and Astaro (free for home use) firewall handling the port forwarding – but I just use the app with the EXTERNAL IP address (I have a static IP from Be) of the router as the WAN IP Address (leaving the LAN IP Address blank) and it works fine, whether at home (on the same wireless network) or away. Give it a try.
Hi,
Everyone using this thermostat should block web interface to external connection because security on this device is a joke. It can be bypassed by anyone who knows your IP and point to direct frames URL
JL – ouch! I’ve just tested this on my unit and got the same result, i.e. the login page checks your username and password, then redirects you to another page. If you take a note of the the address of this page and enter it from another browser, you get full access without any password prompt. Hard to believe such a serious security flaw got into the final product. Have you reported this to Heatmiser?
Thanks Ken. When I originally wrote the article, the app didn’t have the ability to auto-connect to either the home or away address as appropriate, but this has been added since. Good to know that you can just put in your external static IP or dynamic DNS hostname.
Hi,
thanks for the interesting information.
About the config.txt, when I open to edit with my Linux text editor, I get warned that :
“The file you opened has some invalid characters. If you continue editing this file you could corrupt this document.”
I got past the warning and finished editing the file, but afterwards, I was not able to connect to wifi.
As a last resort, I used a Virtualbox XP to run the WiFi Utilility that is downloadable from Heatmiser’s website, and eventually it connected to the network.
I have no explanation for this behaviour, but it might be useful to someone else.
cheers,
-GianLuca
Hi all !
Just to update you guys on my last findings :
First the FAT12 not mounting problem :
No way to mount the FAT 12 partition on Macs running a system above MAC OSX 10.6.x…
I tried with OSXFUSE (http://osxfuse.github.com/) on a Mac running 10.8.x, Disk utility can “see” the FAT 12 drive/ partition but is unable to mount it…
Though, I was able to mount the partition on that same Mac running 10.8.2 but only with a virtualized (VM) 10.6.8 server (under Parallels : http://www.parallels.com/ )
Problem’s that it isn’t that easy to “find” ( … ;-) the needed 10.6.x server (no longer sold/supported) and it is not possible install a virtual 10.6.x client (the normal OSX version) with Parallels or other VM software (Fusion or VMware) because of Apple sometimes stupid policies…
ScreenShots :
1/ http://imageshack.us/photo/my-images/705/1notmountedunder1082.png/
2/ http://imageshack.us/photo/my-images/22/2mountedunder106vm.png/
If really needed I may post a link to a torrent with a (safe ;-) and ready to use 10.6.8 server machine but then you may have to buy Parallels anyway, just to be able to use it… And it’s a 15GB file…
Oh, wait, isn’t MEGA(upload) just back … ? ;-) -> https://mega.co.nz
*******************
More trouble with my Heatmiser PR-TS WIFI … :
The thing worked fine for a month or so and then, suddenly, it started crashing, about once every 48hours leaving me without heating… When crashed it’s irresponsive and doesn’t even light up when touched.
The Heatmiser needs a hard reboot after every crash, it can be done by turning the power off and back on (circuit breaker).
I called Heatmiser support, they told me that the firmware of the 2011 models was faulty and that I needed to upgrade it, that they will send me a “programmer” (device) as it can’t be done “from” a computer like the gazillion other devices that I have upgraded in my life (routers, printers, IP cameras, Macs, etc..) … Does it sound as crazy to your ears as it does to mime ?
I’ll update you guys once I have the “upgrade device” and PR-TS WIFI upgraded.
I also told them about the FAT 12 partition problem. He said that they were aware of the problem but didn’t have any solution… That they didn’t knew why the partition wasn’t mounting on 10.8.x until now… Lucky that I explained them it was the very old/outdated FAT 12 (FS) that was responsible for the trouble…
Will keep you up to date ;-)
Christian
Wow the wifi range is really bad on the unit i have, i have to put the router in the same room to be able to access the unit by HTTP though strangely the android app works fine. 3 bed house with Breezeblock internal walls,
so if you can not connect by the web browser get a WiFi extender or move your router closer to the PRT-TS
Great work Christian! I for one really appreciate your efforts.
Although I am now running Mountain Lion I have Snow Leopard on an external hard drive that I can boot from. I will try booting up from it and see if I can connect to the Heatmiser that way.
I’ve just installed one of these and while I’m delighted that this product exists, there are some unresolved issues:
– Security: as of today you can set a username, password, and PIN. The username is only used by the web-interface (which also uses the password but not the pin, the iPhone app uses the PIN only, and the Android app uses the password only. It is not possible to change the PIN without plugging the device in with USB. It’s also not possible to specify the port to connect with in either of the mobile apps meaning that an attacker need only scan IPs for open port 8068 and then try the 10,000 possible PIN combinations to take control of your heating.
– Interface: I’m finding some of this quite confusing. I understand how to set a schedule – fine. But then if I just want to knock off the heating, how do I do this? I can set the desired room temperature to a low number which it will maintain until the next scheduled change, but there’s no visual indication that it’s following my override rather than the schedule. There’s an off button but it seems to toggle frost protection which seems counter-intuitive.
I’m pretty sure I’m going to figure this out just by using the product for a few weeks but I think a lot of work could be done on the documentation. It would be nice if Heatmiser had a users’ forum so I wasn’t hijacking your very well written blog post with my rantings :)
Hi all !
@ D MCM : yes, that should work but your Mac must be “old” enough to be able to boot from Snow Leopard. Most machine that were shipped with Lion (10.7.x) or Mountain Lion (10.8.x) can only boot on that newer systems…
In case your Mac can’t boot on 10.6.x you can use the 10.6.x server VM solution. Feel free to ask if you need a copy of it ;-)
@Christian – My Macbook is a Late 2008 Aluminium and I put Snow Leopard on to an external hard drive before I upgraded to Mountain Lion. I’ve just tried connecting to the Heatmiser from Snow Leopard and can confirm that it works successfully.
Many Thanks for the tip.
Would have been nice to use this thermostat not mounted on the wall, but with the option to put it in any room you like and move it anytime you want, but I assume this is not possible as it is connected to the boiler through wires ?
Hi Lorand,
The standard PRT-TS Wi-Fi does connect to the boiler via wires, but Heatmiser do sell a kit with an RF receiver so that you can locate the thermostat itself in a different room, although I believe it will still need to be connected to the mains.
Hi all !
Just to keep you guys updated : I received the programer form Heatmiser and was able to upgrade the PRTS-wifi with firmware version 1.6.
So far the Heatmiser stopped crashing (was crashing/freezing twice a day before the upgrade).
Though, I experienced some trouble to apply the upgrade : I had to do it at least 20 times before it finally worked…
After the successful upgrade I also experienced some trouble to save the CONFIG.TXT file …
No way to copy the file on the Mac (under 10.8), edit the file and then copy it back… I had to open the file directly from the “virtual drive” with BBedit, edit it (fill my wifi data etc), and then save it at the same spot, on the “virtual drive”. As far as I can remember this is new as before the upgrade I was able to edit the file and then copy it back on the “virtual drive”, replacing the original one.
No news on the Heatmisers’ USB “drive not mounting” under Mac OSX 10.7.x & 10.8.x… Sorry for that but it may well be impossible to mount it on Macs with systems above 10.6.x Snow Leopard.
I made a .dmg (disk image file) of the drive for testing, it has the same symptoms as when connected with USB to the Heatmiser : mounts on 10.6.x but not on 10.7.x & 10.8.x The .dmg drive (disk image file) is downloadable here for those who may want to try to find a solution : http://rapidshare.com/files/2307861326/Heatmiser.dmg
There is an open thread on this subject on the best French language Mac forum Macbidouille.com (the french version of Hardmac.com) : http://forum.macbidouille.com/index.php?showtopic=365749
A forum member found that it’s NOT only the FAT12 format that is the problem as he was able to mount an old floppy that’s also in FAT12… It may be something else that prevents the “virtual drive” from mounting.
That’s it for now, will keep you updated if there is any worthy news ;-)
All the best !
Christian
I installed one of the Heatmiser Wifi RF kits in Jan. Generally works OK, but every now an again the RF bit fails. Just to be clear the WIFI works fine and I can use an ipad to control the thermostat, no problems there, and it works away from home too as long as you get yourself a fixed IP solution and portforward on your router.
I mounted the thermostat on surface mount box with a standard mains lead so now I can move it around from room to room. Boy am i glad I didn’t bury it in the wall.
It’s the wireless comms link between the wifi thermostat (in the hall) and the receiver next to the boiler (in the utility room) that has the problems. The RF receiver contains the relays that actually switch the HW and CH valves, so this is pretty critical. When these lose coms the heating goes into failsafe mode where it’s on for 12 minutes every hour – not clever when its zero degrees outside (and the water i think just stays off). Spent 2 or 3 hours talking and trying to diagnose issue with at least three of the Heatmiser technical team, but not resolved. In the end I have bought a new kit and will return the old one. Guess what when I installed the new one it is worse that the old one. The first one used to lose contact every few days. but this has done it twice in 4 hours. There must be an under-powered comms transmitter and receiver in these units as I previously had a Drayton Digistat +3 RF which had no problems at all with its thermostat and receiver in exactly the same locations. The two units are only about 7m and brick wall apart, which should not phase a wireless coms link
It’s a shame because this poor RF lets down what is otherwise a well designed product.
Hi all,
@ Rob : You do not need a fixed IP and instead should get a fee http://www.dyn.com (dyndns) account.
That way you always get the correct IP of your router, even it changes every hour ;-)
Fex “robheat.homeip.net” or robheat.any_free_domain_at_dyn.com
Then you enter the parameters of that account in your router (this things almost all have DYN setting) and it will always know what IP this router has.
Then, when you want to access your Heatmiser from outside your LAN (from WAN = away from home) you enter this in your iPhone under WAN IP (etc) like this http://robheat.homeip.net:80 (or any port you forward/translate on your router to the Heatmiser) and you are all set :-)
You also better assign a fixed IP (or even better a static DHCP IP) to the Heatmiser so the router forwarding will always be correct.
All the best !
Christian
PS : I use dyn.com services daily since years and never experienced a problem.
Hi I’ve had an awful boiler fitting experience and now I cant get my Wireless router to connect to the WiFi. Im not sure if ive got all the right IP addresses etc set up and would this prevent the WiFi signal appearing?
I’ve lost the will to live, and not sure if the fact I have a WiFi extender is causing an issue also?
Any advice that can be given would be greatly appreciated? Tried to follow the internet help and the mini booklet provided and still nothing.
Hi Dave, Hi all !
Yes, the Wifi “icon” will only show up if/when the Heatmiser is connected to the router.
The extender shouldn’t cause trouble but it must be set as a repeater, nothing else (no NAT etc).
The wifi (802.11) protocol of the Heatmiser is wifi 802.11b only… So the router and extender MUST include wifi 802.11b, it can be “mixed mode” “b”+”g”+”n” (but not “g” or “n” or “g”+”n” only).
You may also ask for some help from the Heatmiser support team, if they don’t succeed and if you’re on Mac I’ll give it a shot (with TeamViewer). Let me know here.
Chris, what about setting up a forum for the Heatmiser users that we all are ?
All the best !
Christian
Hi Christian,
That’s a great idea – clearly this comment section has become a valuable resource for unofficial Heatmiser support and it’s hardly the best medium.
I’ve set up a basic forum here and suggest that we use this from now on.
Regards,
Chris
Hi,
my thermostat worked fine for 2 month and now started randomly to become unavailable for remote access. The device seems to drop the WiFi connection and needs a POR to start WiFi connection again. Unfortunately I am using this device really in a distant remote location and I am currently forced to travel twice per week to reset the device.
The device is at the latest firmware level according to Heatmiser support.
Heatmiser support is very responsive but so far they have no idea whats wrong and how to fix it.
Regards Thilo
Hi all !
Thanks’ for setting up the forum !
@THILO, come to the forum, here : http://heatmiser.chris.gg/index.php
hi all i today fitted and installed the prt-ts wifi enabled stat i found it a brilliant design and very techie and geeky which is where i pick up most my work as the average spark may not like this type of job.
The only night mare i had was with virgin media as its a chargeable thing thro them £6 a month for port forwarding which they have to do remotely to set up took a bit of time well x3 what it took to install i finally got it going great product.
dsb electrical: Yes I can imagine it’s sometimes difficult for people to find an electrician who’s got the skills to set up wi-fi thermostats correctly. Perhaps one solution would be for Heatmiser to have a registered installers scheme that companies like yours could sign up for.
I’m a little confused as to why Virgin Media are charging you £6/month for port forwarding though. I was able to set it up myself via the advanced settings on my Superhub with no extra charge.
When my heatmiser Wifi Thermostat was installed it worked fine for 3 weeks. I was really impressed, but now I have a recurring problem with the wireless connection (the wifi works fine). Sometimes the thermostat loses connection with the receiver. This results in either the heating not coming on or if it losses connection whist the boiler is on, it just stays on and I come back to a heatwave! Any ideas? I’ve called Heatmiser and they were pretty useless. The 2 units are probably 4m apart. Someone suggested the signal is being affected by another wireless device. Is it possible to change the frequency. Any ideas? Thanks in advance
in response to the last post from kevin, i had this problem too initially
i must say that installation was a complete pain in the a@..! However, it is worth it in the end. Here are my lessons.
1. in order to get the unit to be recognised by the router, you have to fiddle with the encryption settings on the unit. Try changing from WPA to WPA2 or other options. Mine works with WPA2 but not any other option. I have a belkin router which has its own issues. This goes against the advice in the Heatmsier manual, but the advice seems to be router dependent. It will be WPA, WPA2, or “both” settings you will need to use. i would have thought WEP would be unnecessary on most modern routers.
2. You have to set up the unit so that it is working on an IP addess outside the range of those used by the router eg if your router uses IP addresses 192.168.2.1 to 192.168.2.100, then allocate your unit IP address to be 192.168.2.101.
3. Assuming you have set up a dynamic DNS somewhere, or got a fixed IP address for your router, you need to make sure your router does not use its power saving functions. Make sure that if your router has an option to switch off its signal when not in use, please disable this option, otherwise the router will go to sleep after a few minutes.
Best of luck. It took me a couple of weeks of faffing to get it sorted. It is excellent now though.
Please note that the port you need to forward in your router for access outside your own network is 8078 and NOT 8068!
Thanks for the info, Tony. My Heatmiser PRT-TS Wi-Fi (version 1.6) definitely requires port 8068 to be forwarded, not 8078. Which model thermostat are you using?
Nice looking product. But if there is no logging, I don’t think it’s interesting to buy.
It would be nice to have graphs of the temp. and operation data.
Guess I will have to look further.
Thanks for providing such a useful reference!
One thing others might find useful – the Firmware on your device might need to be at 1.3 (you can check it by pressing down on the blank space on the front LCD panel just to the ‘right’ of the up arrow key (which raises the temperature). Hold you finger in that blank space for 10 seconds and it will display your firmware version).
My firmware was 1.2 – and when I went to reprogram my settings as I had installed a new wifi router – I had issues that my laptop wouldn’t recognise the mass storage device (It kept offering to “format” it, and the Wifi utility said “Connection Failed” error.
Fortunately the people at Heatmiser did identify that the problem was firmware, and they sent me a device to upgrade it (which you return back to them in a pre-paid envelope). This has now fixed my problem.
I can confirm, that on my device it is still port 8068 that you need to forward. I was easily able to do this on my previous BT Homehub3 and now on a Virgin SuperHub 2.
Hi M.,
If you have a Raspberry Pi or other Linux box (I use a $20 Linode VPS, you can get logging functionality using the heatmiser-wifi Perl scripts.
Hi Tim,
I’m glad you find this useful :)
Thanks for the tip on checking the firmware version. It took me a couple of tries to get it working (probably due to not holding my finger down long enough) but eventually I got the display to show “16” indicating that I’m running firmware version 1.6 (which is correct).
I wonder what the difference between 1.3 and 1.6 is? I was at 1.2 from a device ordered in April. As written above, I later discovered that I couldn’t adjust my settings as the device was no longer recognized and Heatmiser support identified the problem was my firmware and asked me to update it to 1.3. So I wonder why they didn’t tell me to update to 1.6? As I can see other’s having problems with connectivity – maybe 1.3 is more stable? Would be interesting to know what the differences are…
Before reading the comments was convinced that I want to buy this thermostat, now I’m not so sure. :)
Are there better alternatives at the moment, which have the same functionality and work with 230v?
Have questions about Heatmiser PRT-TS wifi thermostat:
1) If network connection is lost, will the Heatmiser PRT-TS continue to operate and keep the home temperature as programmed?
2) About the poor wifi signal – if my wifi router is on the second floor, approximately 15m from the thermostat, will it work?
Hi Elvis,
I think that the Heatmiser unit is the best option for a wi-fi thermostat at the moment but am happy to be proved wrong.
In response to your questions:
1) Yes, the network connection is only required to access the thermostat remotely (i.e. via web browser or iPhone app). If the network connection is unavailable, the thermostat will keep working.
2) It should do – my situation is similar – but it depends on many variables (make/model of router, structure of your house etc.)
Thank you for Your response. Guess I’m gonna order it then :)
@kevin, check the security type on all devices on your network, wpa2/aes is working well for me, i ended up installing a cheep router with a hidden network just for devices running 802.11b & g.
Perhaps someone can help. Sometimes I have problem connecting to the thermostat from my phone, it simply shows Loading … , and nothing happens, after some time loading circle freezes. My phone has internet connection, also I can connect to my home router from outside. I have setup raspberry pi from your tutorial, I can connect to it as well and get the latest data now, but I simply can’t do it with my phone at the moment. Normally it works fine, but sometimes it doesn’t. I know I should contact first Heatmiser support, but perhaps anyone here had the same issue and knows how to find out where’s the problem, are there any log files heatmiser app is creating?
Hi Chris,
thank you for your very detailed information. Which is already a great help researching. I am thinking about installing the heat miser prt-ts in our holiday home, as it would be perfect to be able to control the heating from far away… but the crashing that has to be fixed by a physical reboot sounds very spooky as I wouldn’t be able to reboot the thing without driving out there… Would you recommend the system for a holiday home? Do you think it is up for the task or will it at least evolve fast enough in order to work seamlessly?
I would appreciate your advice, sincerely, mimi
Hi Mimi,
I have had a couple of occasions where the unit has stopped responding to requests from the iPhone app, and needed a hard reboot to fix. However this could just be an issue with my particular unit or setup. I haven’t had any issues with the unit locking up completely – it still continues to turn the heating on and off based on the temperature and time settings.
Another option is Hive Active Heating from British Gas. Not something I’ve personally used as I’m happy with my Heatmiser, and it is a bit more expensive.
I’ve had a look at these from a security perspective and they are pretty bad really. The PIN can just be brute forced.
This is my blog post on it.
This is a great blog, really useful, thanks Chris. I am now encountering problems with my Heatmiser because of the 802.11b issue. I recently upgraded my Virgin Media Service and the new Superhub does not support 802.11b – so I have the lost the network connectivity that I paid so much for only a few months ago. Any suggestions for how I get it back? All help appreciated. Regards, Nick.
Hi Nick, thanks for your kind comments :)
Assuming you’ve spoken to VM to see if there’s any way 802.11b can be enabled on the new SuperHub, and failing that whether Heatmiser have a software update to enable 802.11g/n (which I guess is unlikely), I would probably just pick up a cheap 802.11b wireless access point, connect it to your SuperHub and set up a separate wireless network just for the Heatmiser. A bit of a faff but it’s the only solution I can think of.
Hi, i accedentally i deleted the config.txt file. Can somebody send me the text contained or the whole file?
Thanks!
So I have 3 of the PRT-HW/TS units for three separate zones, I also have the multi link. I installed it about 18months ago and failed to get it working on wifi so operated them each from their units. I had been using Mac’s to configure both the Multilink and Thermostats.
I tried again tonight, and still failed to join any of my wifi networks, it seems that the Thermostats would forget their settings after a manual/force power cycle to reboot, as they never rebooted like the instructions stated.
Simple resolution, and I hate to say this, though its clearly a Heatmiser issue with their developers incapable of writing Mac OS X apps, as soon as I used a Windows PC, it worked right away!
I like the hint stated here that you do not need to have the units on the wall or powered by mains, as the USB connection will power them. So remove the Thermostats, plug them into a Windows PC or Windows VM and you can configure and test them before returning them to their home in the walls.
So, if you want to configure the Thermostats you are gonna have to find a Windows OS to do it with.
Heatmiser, I presume you will fix this as it really lets you down. Mac people are most innovative, therefore your product will appeal more to them than most, they are an important base for you to cover. I only have one Windows PC left in my house, lucky I could use it for this. I don’t even have any Windows VMs left anymore in my Mac Fusion app. Don’t count on everyone having a Windows PC!
Hi guy. Have we got a heatmiser PRT-TS WIFI termostat? My problem is that the termostat don’t run on windows pc. When I plug it at pc the windows system asks me to format.
I have one of these working well bought in 2013. I just (Mar 2015) failed to locate it again on the Heatmiser web site. I asked Heatmiser support and they replied that they no longer make wifi thermostats. They now have a neo range but it requires a separate gateway box which makes it a more expensive solution.
Vicenzo,
The USB connection to a windows PC allows access to files on the thermostat for configuration. If you want to see the web interface you need to access via WiFi using a web browser.
Regards
Brian
Hi Brian,
Thanks for your reply.
I accidentally formatted the memory of the thermostat.
now I can not access the memory.
Flash memory on thermostat has boot sector corrupt.
To solve problem I need two files:
1. the “CONFIG” file contents in the memory of the thermostat;
2. the file “HEXADECIMAL” memory of the thermostat that can be produced with the following steps:
– download free hexadecimal software “free-hex-editor-neo” from internet;
– install the software on your pc windows 7;
– connect thermostat with usb cable;
– open software “HexFrame”;
– click File, Open, Open Physical Disk;
– select the “heatmiser PRT-TS WIFI” device;
– click OK;
– click File, Save as;
– select Desktop;
– give a name at the file;
– click Save.
Well, on your desktop there is file that I need to run my heatmiser.
Can you send me these two files (CONFIG – HEXADECIMAL)?
my email is vincenzoamat(AT)hotmail.it