Having heard about the new camera driver built into the kernel of the new Raspbian OS image, I decided to have a play, using my PS3 EyeToy camera. The steps below are based on this forum thread, with some changes to reflect my own experience. The Raspberry Pi supports a number of cameras, not just the EyeToy, so if you have a spare one lying around, give it a go.
- Install the ‘motion’package:
sudo apt-get install motion
This should automatically install the required ‘ffmpeg’ package – if not you can just do sudo apt-get install ffmpeg. - Edit the config file:
sudo nano/etc/motion/motion.confTo enable daemon mode (so you can run the software in the background without it tying up your terminal):
daemon onTo increase the resolution to the maximum supported by the EyeToy, change the following lines:
width 640

height 480
If you want the stream to be viewable from other computers on the network (rather than just the Pi itself):
webcam_localhost offIf you want to change the port on which the stream is served (default 8080) – replace 1234 with the desired port number:
webcam_port 1234By default, the camera will only start capturing images (and video) if it detects motion. If you want to take regular snapshots whether motion is detected or not, you can change the following line (the value is in seconds):
snapshot_interval 60(Press Ctrl+X, Y then Enter to save changes and quit the nano editor)
There are loads of other things you can do such as enable a basic remote control interface, tweak the JPEG quality, set up regular snapshots (by default, snapshots are taken only when motion is detected), customise the text which is overlaid onto the image and change the location to which images are saved (by default these go into /tmp/motion which is deleted whenever the Pi is rebooted). Just have a browse through the config file which is fairly well-commented and self-explanatory.
- Now plug the EyeToy into a USB port on your Pi. The two LEDs (one red, one blue) should illuminate. These are not necessary for webcam use so you may want to cover them with black electrical tape or similar.
- Start up ‘motion’ in interactive mode (this is a text-mode app which you can run from the terminal, you don’t need to be in the ‘startx’ GUI:
sudo motion -n
(Without the sudo, I get permission errors which I haven’t yet figured out how to resolve). - Browse to the IP address of your Raspberry Pi on the port you configured earlier (or 8080 if you didn’t change it) in a Web browser. Firefox works fine, but at the time of writing the current stable version of Chrome seems to have a bug with motion JPEG streams, and only shows the first frame. You can work around this by embedding the stream into a simple HTML page, which works fine in Chrome:
<img src="http://ip.address.here:1234" />Alternatively you can open the stream in VLC. You can also browse to the feed on the Raspberry Pi itself, but you will have to install Chrome or Firefox on it as the built-in Midori browser doesn’t support MJPEG streams.
- Once you are satisfied, press Ctrl+C in the terminal to stop the server. You can then start it up in daemon mode:
sudo motion
- If you need to stop the daemon, get its process ID:
cat /var/run/motion/motion.pid
And kill it (replace 12345 with the ID from the above file):sudo kill 12345
If you want to automate this:sudo nano /usr/bin/killmotion
And type in or paste the following lines:#!/bin/bash
sudo kill `cat /var/run/motion/motion.pid`
(Again press Ctrl+X, Y then Enter to save changes and quit)Finally make the script executable:
sudo chmod a+x /usr/bin/killmotion
And whenever you need to stop the motion daemon, just type:
killmotion
And there you have it – a simple baby monitor, security camera or basis for time-lapse photography!
The files can build up quickly though, particularly if you enable regular snapshots, so make sure you have plenty of space on the SD card you are using.
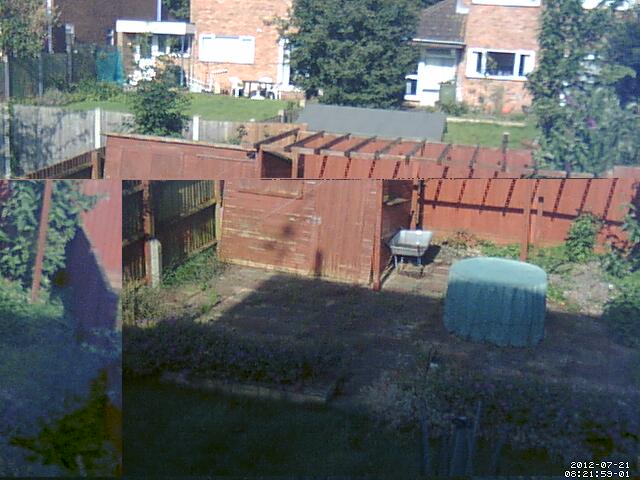
Unfortunately, like the original poster, I noticed that occasional frames had a strange form of corruption (example), which unfortunately the camera detects as motion (although you can tweak the config file to only trigger after a number of consecutive frames of motion). I suspect this may be due to the Raspberry Pi not providing quite enough power to run the camera stably. A powered USB hub may solve the problem, or more drastically, desoldering the two LEDs. Reducing the resolution back down to 352×288 apparently fixes the problem, but obviously means lower image fidelity.
If you don’t already have an EyeToy or spare webcam, it’s probably best to wait for the official Raspberry Pi camera module. It will plug into a dedicated connector on the board so you’re not hogging a USB port, and will obviously be more stable. The pre-release version uses a 14-megapixel sensor, but it’s likely that a lower resolution sensor will be used in the final release to keep the costs down. A good-quality 720p (just under 1 megapixel) sensor would be nice, 1080p (just over 3 megapixels) even better.