Heatmiser PRT-TS Wi-Fi thermostat review & troubleshooting tips

I recently decided to replace my central heating programmer with a programmable thermostat, and decided to go for the geeky option: a wi-fi connected model! So I ordered a PRT-TS Wi-Fi from Heatmiser, which can be controlled both via a Web browser and an iPhone app.

Overall, I’m happy with the product but I found it a little tricky to set up. The instructions don’t go into a huge amount of detail, a problem which is compounded by the fact that the Heatmiser support site was devoid of any information on this particular model at the time of writing, so I have discussed my difficulties below and explained how I resolved them.

Installation

I won’t go into too much detail on the physical installation, but suffice to say, most people should get the unit fitted by a qualified electrician. There’s only a page and a half of the small (A7 size) manual devoted to it, plus three wiring diagrams, and any mistakes could damage the thermostat and/or the boiler. The thermostat is designed to be flush mounted into a standard 35mm deep single back box. It can be surface mounted but it won’t look as good, particular as the thermostat is a few centimetres larger than the back box at each edge. I chose the latter option to save money, but will have it flush mounted at a later date. I will be interested to see what effect flush-mounting has on the Wi-Fi signal strength, if any.

Appearance & usability

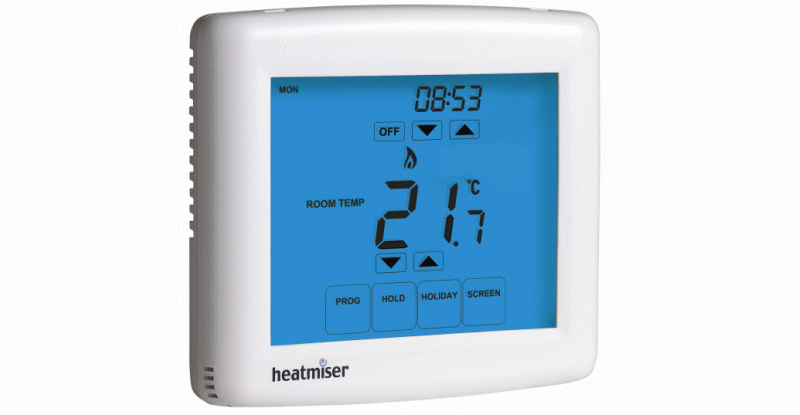
The thermostat is essentially a PRT-TS with an added Wi-Fi card, and it looks exactly the same from the outside. It’s reasonably modern-looking (as far as thermostats go!) with a touchscreen illuminated by a blue backlight. It displays the room temperature in the middle of the screen, which can be adjusting using the up/down icons below it. A slight niggle is that it can be difficult to see what you are doing – the backlight doesn’t come on until you touch an icon, by which time it is too late. I would personally prefer the backlight to come on when touching any part of the screen (not just an icon) and the unit to only respond to icon presses when the backlight is on.

A nice feature is the “Screen” icon which locks the screen for 15 seconds, allowing time to clean it without accidentally activating any functions.

You can also view and set heating programmes, set the clock, enable temperature hold and holiday modes from the touch screen. I found setting the time slightly strange, as the down button changes the hour down and the up button changes the minute up – changing the date works in a similar way with the month and day – but this is something that is rarely necessary to change and can be done from the Web interface or iPhone app anyway.

Wi-Fi setup

Setting up the Wi-Fi connectivity nominally requires a Windows PC and the configuration utility supplied on CD. However, when plugged in via USB, the device presents itself as a USB mass storage device (albeit a very small one: 6.5KB) containing a single file – CONFIG.TXT – which contains the network configuration information in plain text, which could easily be edited by hand by users of other platforms such as Mac or Linux. The file is fairly self-explanatory – the only thing worth pointing out is that the KEYMODE parameter (wireless encryption type) must be either WPA, WEP or OPEN.  There’s a slight security issue in that if someone were to steal your thermostat, they’d have access to your wireless key, thermostat password and PIN, but this is a fairly unlikely scenario!

I had trouble getting the unit to connect to my Wi-Fi network until I switched my router (Linksys WRT54GS with Tomato firmware) from WPA only to WPA+WPA2 encryption. I’m not sure whether this means that the PRT-TS needs WPA2 encryption to operate (despite the configuration utility only showing WPA), or whether there is an issue with my particular router, but if you’re having trouble, it’s worth enabling WPA2 on your router. Before I managed to get WPA+WPA2 working, I tried using WEP encryption as a test but the configuration utility wouldn’t let me save the changes. I didn’t play with the OPEN option, so I’m not sure whether this refers to unencrypted Wi-Fi (and therefore will ignore any username/password) or WEP Open System encryption.

The device requires a static IP address, and port 8068 must be forwarded via the router if remote connection via the iPhone app is required.

It’s worth noting that the front part of the thermostat detaches from the rear, so it can easily be removed once installed, and the front part will power up when attached via USB which means you can set up and test the Wi-Fi connectivity before installing the unit on the wall. This isn’t mentioned in the manual, and neither is the fact that a Wi-Fi icon (similar to the one used on the iPhone) appears on the display when connected successfully.

Browser interface

The browser interface is full-featured if a little basic-looking – it’s reminiscent of a router interface from ten years ago. The so-called “Live View”  panel on the right shows the actual temperature (to one decimal place), set temperature and heat status, and a refresh button as it doesn’t seem to auto-refresh. The main interface allows you to view and adjust heating programmes, temporarily override the temperature, lock the keypad remotely, set the clock and change network settings. There doesn’t seem to be a way to change the port on which the Web interface is accessible, which would be a nice feature to have.

It doesn’t contain any form of logging functionality, so it’s not possible to view temperature changes over time. This would be nice to see in a future firmware update, but I’n not holding my breath.

iPhone app

The iPhone app, a free download from the App Store, is similarly utilitarian. It allows you to see the current temperature (rounded to the nearest degree, unlike the browser interface), set temperature (which can be adjusted) and heat status. You can also view and adjust heating programmes via the app.

One quirk of the app is that you have to select whether you want to connect locally (i.e. when you are on your home Wi-Fi network)  or remotely (via the Internet). It would be nice if the app could determine whether you are home or away and select the corresponding connection method dynamically.

The interface is fairly bland but it does the job. It’s a shame that the graphics aren’t retina ready, so they look jaggy on the iPhone 4 (which has been out for more than a year, so you would have expected Heatmiser to have updated their app!). It would also be nice if a future version of the app came with iPad support – the current version works fine on the iPad but doesn’t take advantage of the bigger screen.

I was left scratching my head for a while, as I was originally able to connect via my Web browser but not via the iPhone app. This resolved itself once I moved my router closer to the thermostat, so it seems that the protocol used by the iPhone app is less forgiving of low signal strength (and potential packet loss) than standard HTTP over TCP/IP. Again this is something that should perhaps be mentioned in the manual.

Conclusion

It’s a version 1 product, so is sometimes a little rough around the edges, but the hardware is solid and the product could easily be improved with updates to the Web interface and iPhone app. The manual is fairly basic, which I can understand is necessary to minimise the size and weight of the box, but why not include a more detailed version on the included CD and/or on the Web?

One final point is that I was slightly perturbed to find that the thermostat, which I paid £150 plus delivery for via Heatmiser’s own shop, is available for as little as £126 delivered from some resellers, so it pays to shop around!

Update

Heatmiser tweeted me and pointed me towards their document download area which contains some useful information. They also say they’re working on a new version of the iPhone app, iPad and Android support, multi-zone and logging functionality, and suggest that users email support@heatmiser.co.uk with any further suggestions.

Also, the £126.20 price I found is actually ex-VAT (thanks Luke!) so it is actually best to buy from Heatmiser directly.

Display filename instead of document title in SharePoint search

My employer has been using SharePoint for a number of years now, and it’s recently come to light that people haven’t always been putting meaningful information in the Document Title field. It seems that if this field is left blank, it will default to the document filename, but a lot of our documents have incorrect titles. e.g. if they have been based on a template or another document.

Clearly the best solution is to educate users to use the Title field properly for newly-created documents (see Title vs Name), and also to update all existing documents, but it’s a big task and for now we have opted for the”quick fix” of showing the document filename in search results. Here’s how you do it:

  • Ensure that the IsDocument managed property is set for use within scopes:
    • Browse to Central Administration
    • Click on your Shared Service Provider
    • Click Search settings
    • Click Metadata property mappings
    • Find the IsDocument property and set Use in scope to True
    • Click OK
  • Edit the page and modify the Search Core web part
  • Under Results Query Options, edit the Selected Columns property to include Filename:
    <Column Name=”Filename”/>
    (it doesn’t matter where as long as it is between <Columns> and </Columns>, and obviously not halfway through another <Column> tag)
  • Find the following line (it should be in the Result template):
    <xsl:variable name=”id” select=”id”/>
  • Underneath it, add the following two lines:
    <xsl:variable name=”filename” select=”filename”/>
    <xsl:variable name=”isdocument” select=”isdocument”/>
  • A few lines down, replace the code starting with <span class=”srch-Title”> and ending in</span> with the following:
    <span class=”srch-Title”>
    <a href=”{$url}” id=”{concat(‘CSR_’,$id)}” title=”{$url}”>
    <xsl:if test=”$isdocument &#61; 1″>
    <xsl:value-of select=”filename”/>
    </xsl:if>
    <xsl:if test=”$isdocument &#61; 0″>
    <xsl:choose>
    <xsl:when test=”hithighlightedproperties/HHTitle[. != ”]”>
    <xsl:call-template name=”HitHighlighting”>
    <xsl:with-param name=”hh” select=”hithighlightedproperties/HHTitle” />
    </xsl:call-template>
    </xsl:when>
    <xsl:otherwise><xsl:value-of select=”title”/></xsl:otherwise>
    </xsl:choose>
    </xsl:if>
    </a>
    <br/>
    </span>

I found this tip on the TechNet forums, although it didn’t work as-is because the author had forgotten to declare the isdocument variable. It has been tested in MOSS 2007 but will possibly also work in SharePoint 2010. If desired, you could easily tweak the XSL above to show the document title as well as the filename.

There’s no easy way of changing the OSSSearchResults.aspx page that appears when you do a “This Site” search, and even if you do, it’s unsupported and any changes will most likely be lost next time you install a MOSS service pack. If you have ISAPI_Rewrite installed, as we do, you can easily redirect site searches to the Search Center using this line:

RewriteRule ^(.*)OSSSearchResults.aspx(.*)$ /SearchCenter/Pages/results.aspx$2 [I,L,RP]

“Cannot save the property settings for this Web Part” error when using SmartPart in SharePoint

I recently deployed a custom user control using SmartPart on SharePoint 2007, and although everything else seemed to work fine, I came across the following error when trying to edit the properties (in my case, the chrome type and width):

Cannot save the property settings for this Web Part. Exception occurred. (Exception from HRESULT: 0x80020009 (DISP_E_EXCEPTION))

I managed to resolve this, thanks to an MSDN forum post, by changing one of my lines of code:

using (SPSite oSiteCollection = SPContext.Current.Site)

to the slightly more long-winded:

using (SPSite oSiteCollection = new SPSite(SPContext.Current.Site.ID))

I’m not sure why using SPContext.Current.Site directly (versus creating a new SPSite object) causes this behaviour, but at least it’s a simple fix.

How to disable time synchronisation under Virtual PC 2007

One of the benefits of the Virtual Machine Additions for Virtual PC is that the time is automatically synchronised with the host machine. In most cases this is desirable, but I ran into a case recently where I needed to test something using an earlier date, and not realising this I wrestled with the time settings of the guest OS to no avail – it just kept resetting to the current time!

The process for disabling this feature (on an image-by-image basis) requires editing the VMC file and is detailed at Ben Armstrong’s blog.

How to increase/decrease the time your iPhone rings before diverting to voicemail

The iPhone supports ringtone of up to 30 seconds, but most networks will divert to voicemail before you gets a chance to hear the full ringtone.

The way around this is to instruct your network to increase the delay before a caller is sent to voicemail:

  1. Via the Phone app, enter *#61# and press Call.
  2. Write down the message that appears after “Forwards to”. This is your voicemail access number.
  3. Now dial **61*xxx*11*y# (where xxx is your voicemail access number and y is the number of seconds before the call should be sent to voicemail – this must be a multiple of 5 seconds) and press Call.

I have tested this tip on an iPhone 3GS on Orange and an iPhone 4 on O2, but it should work on all phones and networks as it’s a standard GSM feature.

How to cut your own micro SIM card for free, in time for iPhone 4 launch day

I braved the queues (actually, the barrage of error messages) on Tuesday, 15 July, to pre-order my iPhone 4 direct from Apple. Hopefully I’ll save in the long run as I’m planning to go for a £10-15 pay-as-you-go or SIM-only contract deal rather than being tied in to a £30+ contract for 18 to 24 months.

Until I’ve figured out which operator to go with, I plan to stick with my current O2 contract. I’ve crossed my fingers that O2 will ship me a microSIM before I get the phone, otherwise I will be going down the DIY route, trimming my existing SIM down using this PDF template. In case you don’t read German, here’s a quick translation of the instructions:

Micro-SIM template for iPad/iPhone 4 SIM cards

The Apple iPad (and upcoming iPhone 4) uses not a standard 25x15mm SIM card, but a micro-SIM. The micro-SIM format is 15x12mm, but the contact layout is identical to a standard SIM.

Therefore, it is possible to convert a standard SIM into a micro-SIM which can be installed in the iPad or fourth-generation iPhone.

How does it work?

  1. Print the stencil at 100% – don’t shrink to fit the page. The outer black portion should match the size of your existing SIM.
  2. Cut and paste the stencil on the back of the SIM (not on the contacts!). The white area must be exactly on the reverse side of the chip.
  3. With sharp scissors, cut cleanly along the outline of the inner white area.
  4. Remove the stencil. If necessary,  diagonally trim the corners and/or grind down the edges with a nail file.

I accept no responsibility if you damage your SIM by following these instructions… in fact I’m too busy worrying about whether I’ll break mine!

There are commercial card cutters that can do the job, but I can’t justify spending upwards of £20 for something I’ll only use once or twice at most, and again there’s no guarantee that the item would be delivered by launch day.

Repairing Dell MediaDirect blue screen issue

My brother-in-law recently reported a problem with his Dell XPS M1530 laptop. When starting the laptop (using the power button), it displayed a greyscale Dell MediaDirect logo for a few seconds, then a Blue Screen of Death relating to a Plug & Play driver.

When I restarted while holding F8 in an attempt to access Windows Vista in safe mode, the boot menu showed only “Windows XP Embedded”, and booting into safe mode just resulted in another blue screen. This is when I began to suspect the MediaDirect feature, which allows users to view media such as DVD movies without having to boot into full Windows.

Sure enough, when I powered off the machine and pressed the “Home” logo button, the laptop attempted to boot into MediaDirect (with a colour logo) and showed the same blue screen as before.

I did some research online and ended up finding a download for a MediaDirect Repair boot CD. This appeared to run successfully, but actually didn’t help. Now when I booted up, I just got a black DOS-type screen with the text “2 active partitions” in the top left-hand corner. It looked like the repair CD had somehow corrupted the partition table by setting two partitions as active – not good news!

Fortunately, I found a forum post by a user of a different model of Dell laptop running Windows XP. This inspired me to try the Vista recovery CD (you can also use your original Vista installation CD if you have it to hand), running the BootRec /FIXMBR and BootRec /FIXBOOT commands as detailed in this knowledge base article.

This fixed the issue and the laptop was now able to boot into Vista as normal.

I then tried my luck with powering off the machine and booting into MediaDirect using the “Home” button. Unfortunately this brought the system back to its earlier, broken state, and turning it off and on again using the power button revealed that I wasn’t able to get back into Vista!

I repeated the BootRec steps and this got the system working once again. Further research showed that Dell have released a new version of MediaDirect which removes the “dual boot” functionality, so I can only imagine they’ve had quite a few problems with it!

I returned the machine it to my brother-in-law with instructions not to touch the Home button for the time being, and to try installing the new MediaDirect software. I’ll report back when I hear the results.

Removing Excel macro passwords

At work, I recently needed to edit a database connection string in an Excel spreadsheet. Unfortunately the macros were password protected, the person who wrote the spreadsheet left the company some years ago, and we had no record of the password.

Luckily, thanks to a post on David Bugden’s blog, I discovered that it’s simple to circumvent VBA macro password protection without having to purchase a commercial utility such as Passware’s VBA Key.

The hex editor method worked for me in Excel 2003, although I’m not sure whether Microsoft have beefed up the security in 2007 and later versions.

If you want to remove the password used to protect/unprotect worksheets and workbooks, there is some information available here.

Auto Aid breakdown cover: the other AA

Having held an AA membership for just under a year, I recently had occasion to call them out for the first time. I wasn’t at all pleased with the experience, so decided to vote with my feet and look into signing up with one of their competitors.

When I mentioned this to a colleague, he recommended Auto Aid. Like the AA, the RAC and Green Flag, they provide breakdown cover for £37 per year, which is quite reasonable. They don’t operate their own recovery fleet, but instead send out a local garage to pick up your car. You then pay the cost of the recovery on your credit card and claim this back from Auto Aid. A year’s membership costs £37, which covers yourself and your spouse and includes recovery to and from anywhere in the UK,  even if you break down on your doorstep.

I hadn’t heard of Auto Aid before my colleague mentioned it, but renowned financial expert Martin Lewis has good things to say about Auto Aid on his Money Saving Expert website so I decided to give it a go.

Their website is basic but tells you everything you need to know. I filled in the online application and received a call back the next day to confirm that I wanted to go ahead and to take my payment. Five minutes later, I was covered, and for a fraction of what the AA would have charged me for renewal.

Hopefully I won’t need to call them out any time soon, but if I do I’ll be sure to report back. I’d be very surprised if they did any worse than the AA though, given my recent experience!

Find the fastest DNS server with Google NameBench

One of the factors that dictates browsing speed is the time it takes to do a DNS lookup – that is, convert a domain name such as google.com into an IP address such as 209.85.227.105. Generally most people use the DNS servers operated by their ISP. Usually this is fine, but sometimes ISP DNS servers can be unreliable, and they’re not always the fastest choice.

There are many free public DNS services, such as OpenDNS and search giant Google’s Public DNS, but it’s difficult to know which one is best for you. Enter NameBench, a free cross-platform tool which tests a raft of public DNS services using either your browser history or a list of top domains. Once the tests are complete, you receive a summary of the results including suggested primary, secondary and tertiary servers:

So if you’ve got a few minutes to spare, why not see if you can shave a few milliseconds from your page load times?